hasselback butternut squash with feta
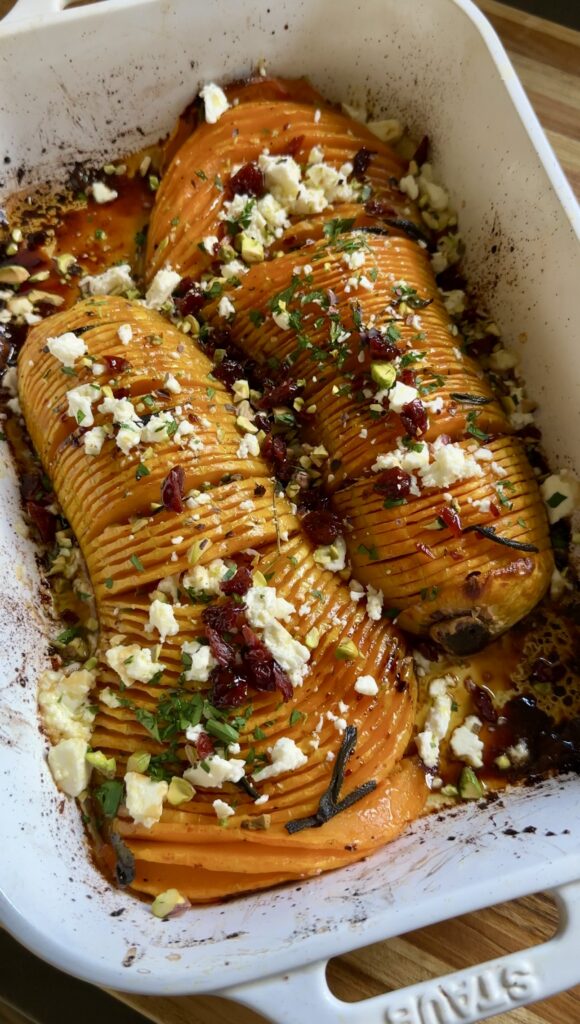
I know I’m biased because I don’t eat turkey, but I honestly think this hasselback butternut squash could be the star of any holiday table. It’s simple and flavorful and so incredibly festive — just look at those colors!
how to hasselback butternut squash
If you’ve never hasselbacked a vegetable (or fruit!), the technique is simple. Place the squash between two chopsticks (or dinner knives), then slice into thin strips crosswise. Your knife will hit the chopsticks before it reaches the cutting board, ensuring you don’t cut all the way through. For this recipe, you’ll roast the squash for a bit before hasselbacking it, making it even easier to slice.
Here is a good visual (starting at the 30 second mark).
flavoring your squash
After you’ve returned the squash to its baking dish, you’ll tuck fresh sage leaves into a few of the slices. Then, back to the oven it goes, where you’ll baste it with an olive oil, maple syrup, and chili flake mixture halfway through cooking. (Alternatively, use hot honey — yum!) Out of the oven, you’ll finish it with crumbled feta, which offsets the sweetness with its signature tangy, salty flavor.
The rest is up to you: I like fresh herbs, salted pistachios, and dried cherries. But honestly, use what you love and what you have on hand! Pomegranate seeds and toasted, salted pepitas would be great, too.
hasselback butternut squash with feta
serves 4 as a main; 8 as a side
Ingredients
- 1 large butternut squash (about 3 pounds)
- 3 tablespoons extra-virgin olive oil, divided
- kosher salt and freshly-ground black pepper
- 2 tablespoons pure maple syrup
- 1/4 to 1/2 teaspoon red pepper flakes, depending on spiciness preference
- 6 to 8 fresh sage leaves
- crumbled feta cheese, chopped salted pistachios or salted pepitas, dried cherries, pomegranate seeds, and/or finely chopped parsley, for serving
Instructions
- Heat the oven to 425°F. Halve the squash lengthwise, scoop out the seeds, and peel.
- Place the squash halves in a baking dish just large enough to hold them side by side. (Alternatively, use a braiser or an oven-safe skillet). Rub all over with 1 tablespoon of the oil and season both sides generously with salt and black pepper. Arrange cut side down and roast until beginning to soften, 15 to 20 minutes (a paring knife should slide in only about 1/4").
- Meanwhile, whisk together the maple syrup, remaining 2 tablespoons oil, and a pinch of red pepper flakes until combined.
- Transfer the squash to a cutting board and let cool slightly. Place one half between two chopsticks (these will prevent you from cutting all the way through). Score the squash into thin shingles crosswise, stopping when you reach the chopsticks. Return to the baking dish and repeat with the second half. There are tons of YouTube videos showing this technique if you need a visual!
- Tuck the sage leaves between a few of the shingles, drizzle with half of the maple syrup mixture, and season again with salt and pepper. Return to the oven and roast, basting with the remaining maple syrup mixture (and any that has pooled in the baking dish) halfway through, until completely tender, 45 to 60 minutes. I like to baste again when there's 10 minutes left on the timer. Be sure to really get it into all the nooks and crannies! Remove any burnt bits with a spoon, if necessary.
- Top the squash with your desired toppings, such as feta, pistachios, parsley, and dried cranberries. (Just make sure you have something salty to offset the sweet squash.) Serve warm.





I made this with my b-e-a-utifil girlfriend. Definitely worth the hassle. We will be back.
10/10
It was delicious!
So good that we discussed it at the Thanksgiving table.
I topped it with chopped pistachios, craisins and feta.
Thank you!
Awesome recipe! This was the hit of thanksgiving dinner. Beautiful presentation and delicious. Will definitely make again.
I’m so glad!!!
Because the bulbous end of squash wall is thinner, it cooked faster and collapsed so presentation not perfect. Anyone else have this issue?
Do you peel the squash first?
Yes, I always peel the squash first.
I have this added to my Thanksgiving menu! I have a lot of work prior and wondering how well this reheats. I’d love to make it today and just have to warm it up on Thanksgiving! Thank you! Can’t want to try!
I’m so glad you’ll be making it for Thanksgiving! I think your best option would be to do the initial roasting and slicing so that step is out of the way, and then refrigerate it until Thursday. On Thursday, brush it with the glaze and return it to the oven for the second roasting, and then add the toppings just before serving.
You could also do the whole thing today and then re-warm it in the oven and add the toppings just before serving. It will still be great!
Can this be made ahead of time and warmed up before serving?
I would recommend doing the initial roast in advance and slicing it, then refrigerating it on the baking sheet until the day you’re planning on serving it. Then, brush it with the glaze, return it to the oven for the second roasting, and add the toppings just before serving.
If that’s not an option, then yes — do everything except add the toppings and re-warm it in the oven before serving.
gonna try it
Let me know what you think!
I had to come back and comment about this dish. Excellent!! I’ll definitely be making this again
I’m so glad!!!
This was delicious and very straightforward to make! I’m gluten and dairy free, so I made it without the feta. I also didn’t have sage, so I used rosemary. This was my first time making one of these squashes, im sure I’ll be making it more from now on.
Rosemary sounds perfect! So glad you enjoyed it.
So eager to make this! I was wondering if you think dried cranberries would work in place of dried cherries.
Absolutely!!
I have a butternut squash and was pleased to see your recipe. I will try this on the weekend. Thank you.
Enjoy!!!
Can you please edit this post to explain the hasselback method better? Like between two chopsticks how? I need a visual or better text explanation, explain it like I’m five 🙂
Yes, thank you for the suggestion! I just linked what I hope is a helpful YouTube video that shows the process. Here it is: https://www.youtube.com/watch?v=3vIj2D4Y3WY